Here I present a detailed example to demonstrate the following technologies on Fedora 16.
This demo was part of a FOSDEM presentation given in Feb 2012.
ssh root@10.0.0.4 'echo c > /proc/sysrq-trigger'
This demo was part of a FOSDEM presentation given in Feb 2012.
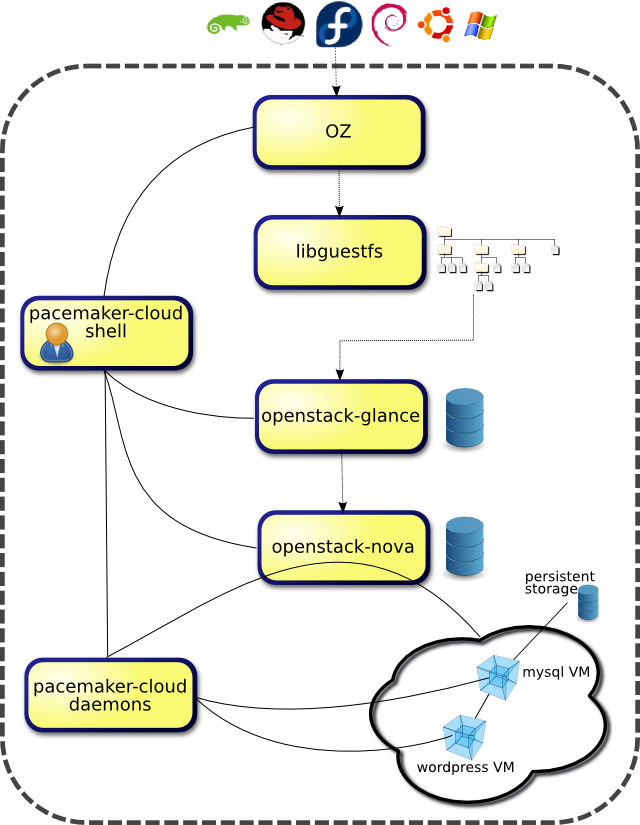
| pacemaker-cloud | High Availability for various IaaS platforms |
| oz | automated guest image generation |
| libguestfs | guest image manipulation |
| openstack-glance | guest image registration & delivery |
| openstack-nova | commands and APIs for cloud control |
The example shown is to provide a highly available wordpress instance that is implemented across multiple virtual machines. Note while openstack can run within a VM, the OZ component of this demo currently needs to run on bare metal.
The main pacemaker-cloud developers are Steven Dake and Angus Salkeld, and these instructions follow Angus' initial and improved openstack and pacemaker-cloud integration instructions, and Steve's wordpress configuration recipe.Overview
The structure of this example is depicted below, with the large dashed box representing the single host we're running in, and the icons outside representing the standard install images to be converted for use in the cloud. You can see the pacemaker-cloud daemons at the bottom of the diagram, monitoring and restarting the VMs and their services. Also included with pacemaker-cloud is a shell (pcloudsh), which orchestrates all the components, as well as providing status updates for the monitored services. Note we only need to interact with pcloudsh after the initial installation and setup.
Installation and Setup
Install openstack
From the Fedora 16 openstack test day:- Install the openstack packages
- run the new openstack-nova-db-setup helper script, added since the test day
- run chkconfig mysqld on to enable mysqld on reboot (should probably be part of helper script)
- Start openstack glance
- Start openstack nova. Note vgcreate in this step needs to be repeated at host boot, if you want to make openstack volumes available
- Create an openstack user and network. Note the "network create" command in this step needs to be adjusted to include the "--bridge_interface" parameter, specifying a physical interface on your host, that is up
Install OZ
host=repos.fedorapeople.org
file=oz-0.8.0-1.fc15.noarch.rpm
yum install http://$host/repos/aeolus/oz/0.8.0/packages/fedora-15/x86_64/$file
Get the VM base image
We're using the 3.5G Fedora 16 DVD in this example.(cd /var/lib/libvirt/images/ && {
host=download.fedoraproject.org
file=Fedora-16-x86_64-DVD.iso
wget http://$host/pub/fedora/linux/releases/16/Fedora/x86_64/iso/$file
})
Build and install latest pacemaker-cloud
git clone git://github.com/pacemaker-cloud/pacemaker-cloud.git
cd pacemaker-cloud
git checkout v0.6.0 # until F16 gets libqb >= 0.9.1
# use yum install command for Fedora 15 from README
./autogen.sh
./configure && make
yum install rpm-build
make rpm
yum install $(arch)/*
Disable the qpid AMQP server
openstack uses rabbitmq, while pacemaker cloud uses qpid. Now pacemaker cloud starts its own broker (on port 49000), so disable this conflicting default broker. Note openstack is getting support for qpid soon.service qpidd stop chkconfig qpidd off
Start pacemaker-cloud
systemctl enable pcloud-cped.service
systemctl start pcloud-cped.service
pcloudsh quit # to verify it's running
Allow iscsi and matahari through the firewall
lokkit -p iscsi:tcp
lokkit -p iscsi:udp
lokkit -p iscsi-target:tcp
lokkit -p iscsi-target:udp
lokkit -p 49000:tcp # one can use the 'matahari' name in Fedora >= 17
misc setup
getent passwd admin || useradd admin # pcloudsh requires a system user a/c
install -m0755 dep-wp.sh /var/lib/pacemaker-cloud # sript to (re)config assemblies
Setup the wordpress cloud
Build the JEOS
Ensure you have around 30G free from here on. Note the Free space check in OZ is not robust, and the failure mode is infinite wait. Note also we disable selinux below as that causes a failure (in the image customization step only) and again the failure mode is infinite wait.setenforce 0 pcloudsh jeos_create F16 x86_64
Create persistent storage for the VMs
openstack instances are stateless, and need to be connected to stateful storage. Here we provide that using iscsi. Alternatively one could use openstack volumes, but we'll remain IaaS platform agnostic here. Note the following commands need to be run at each boot of the host.SYSTEMCTL_SKIP_REDIRECT=1 /etc/init.d/tgtd start # Note bug 797913 ( cd /var/lib/pacemaker-cloud && test -e wordpress || dd count=100 bs=1M of=wordpress if=/dev/zero tgt-setup-lun -d $(losetup --show -f wordpress) -n iqn.2001-04.com.beast.wordpress )
Create the deployable & assemblies
Assemblies in pacemaker-cloud correspond to virtual machines, and a deployment is a grouping of those, to provide a particular service. Here we create a VM running the wordpress web app, connecting to a separate MySQL VM providing the storage.In production, pcloudsh wouldn't be used to define the deployables, and instead the IaaS platform would provide this information to the pacemaker cloud daemon through its AMQP or HTTP APIs
Note ignore the "WARNING: no socket to connect to" message which seems to be a gnome-keyring issue
pcloudsh deployable_create dep-wp openstack admin
pcloudsh assembly_create assy-wordpress-F16 F16 x86_64
pcloudsh assembly_create assy-wordpress-mysql-F16 F16 x86_64
pcloudsh deployable_assembly_add dep-wp assy-wordpress-F16
pcloudsh deployable_assembly_add dep-wp assy-wordpress-mysql-F16
pcloudsh assembly_resource_add http_wordpress httpd assy-wordpress-F16
pcloudsh assembly_resource_add mysql_wordpress mysqld assy-wordpress-mysql-F16
pcloudsh escalation_assembly_set assy-wordpress-F16 3 300
pcloudsh escalation_assembly_set assy-wordpress-mysql-F16 3 300
pcloudsh escalation_resource_set http_wordpress assy-wordpress-F16 3 1000
pcloudsh escalation_resource_set mysql_wordpress assy-wordpress-mysql-F16 3 1000
Control and Monitor the deployable
Start the deployable
The "deployable" here represents the two VMs providing the wordpress service. The first time this is run there will be a delay while nova generates the staging images in /var/lib/nova/instances/_base. Note here we use the pcloudsh interactive shell, so we can see status messages and issue further commands.pcloudsh# deployable_start dep-wpAfter running the above we should see
Starting Deployable dep-wp
The assembly [assy-wp-F16] in deployable [dep-wp] is ACTIVE.
The assembly [assy-wp-mysql-F16] in deployable [dep-wp] is ACTIVE.
The resource [httpd] in assembly [assy-wp-F16] in deployable [dep-wp] is ACTIVE.
The resource [mysqld] in assembly [assy-wp-mysql-F16] in deployable [dep-wp] is ACTIVE.
The deployable [dep-wp] is ACTIVE.
  MySql IP:     10.0.0.3
  Wordpress IP: 10.0.0.2
Demonstrate High Availability
Browse to http://10.0.0.2/wordpress and install to avoid subsequent "wp_options" warnings. Now kill the wordpress web server ssh root@10.0.0.2 'killall -9 httpd' after which we should see the recovery in our running pcloudsh.The resource [httpd] in assembly [assy-wp-F16] in deployable [dep-wp] FAILED. The deployable [dep-wp] is RECOVERING. The resource [httpd] in assembly [assy-wp-F16] in deployable [dep-wp] is ACTIVE. The deployable [dep-wp] is ACTIVE. MySql IP: 10.0.0.3 WordPress IP: 10.0.0.2After killing the web server for the third time (within 1000 seconds) we get an escalation, which will cause the assembly (VM) to be restarted.
The resource [httpd] in assembly [assy-wp-F16] in deployable [dep-wp] FAILED.
The deployable [dep-wp] is RECOVERING.
A service recovery escalation terminated assembly [assy-wp-F16] in deployable [dep-wp].
The assembly [assy-wp-F16] in deployable [dep-wp] FAILED.
The assembly [assy-wp-F16] in deployable [dep-wp] is ACTIVE.
The resource [httpd] in assembly [assy-wp-F16] in deployable [dep-wp] is ACTIVE.
The deployable [dep-wp] is ACTIVE.
  MySql IP:     10.0.0.3
  Wordpress IP: 10.0.0.4
We can also see immediate restart of a VM on a kernel panic for example, which one can trigger like
ssh root@10.0.0.4 'echo c > /proc/sysrq-trigger'
Cleanup
Stop the VMs
deployable_stop dep-wp
Destroy the deployable and assemblies
If you don't want to start the wordpress services again, running this will remove the records from pacemaker cloud and the images from glance. Note assembly_delete doesn't delete the staging images from /var/lib/nova/instances/_base, but that will be handled by nova itself in futurepcloudsh assembly_resource_remove mysql_wordpress assy-wordpress-mysql-F16 pcloudsh assembly_resource_remove http_wordpress assy-wordpress-F16 pcloudsh assembly_delete assy-wordpress-F16 pcloudsh assembly_delete assy-wordpress-mysql-F16 pcloudsh deployable_delete dep-wp
© Jan 19 2012